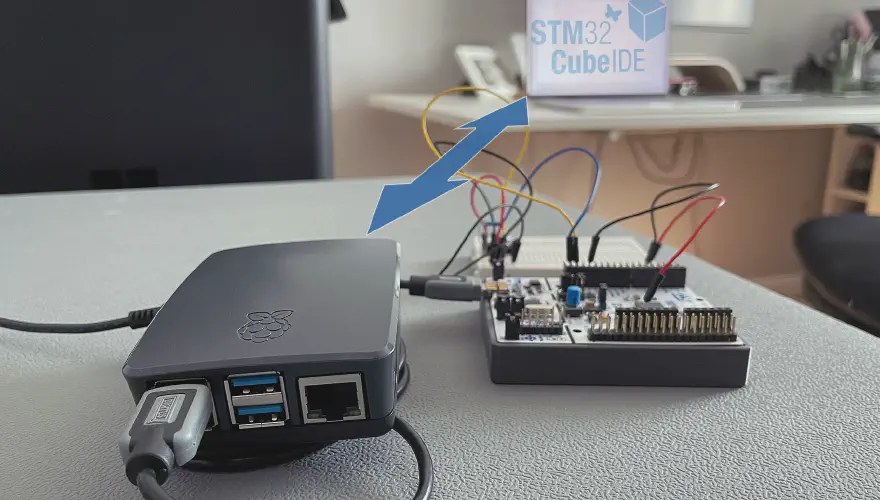
Achieve Wireless Embedded Programming Over Network with Raspberry Pi
As an embedded system enthusiast, I’m constantly tinkering with microcontrollers, but there’s always that one inescapable truth: you need a physical USB cable. It connects your powerful development machine directly to the embedded hardware, letting you flash new firmware or debug that tricky sensor issue.
But here’s the truth: that physical bond severely limits at least my flexibility. I love working from different spots – sometimes it’s my desk, sometimes a cozy bed with my MacBook, sometimes even in the garden. Imagine needing to flash new firmware or debug a sensor, but your dev board is stuck in the workshop, or maybe even in a noisy corner of the house. Or perhaps you’re like me, constantly on the go with a mobile laptop, plugging and unplugging, and totally disrupting your flow. It felt like I was constantly tied to a leash, similar to my issue with the SSD mount…lol
This nagging problem kept bugging me: how could I break free? I wanted to work remotely, independent of where the hardware actually sat. Sure, if I’m fiddling with buttons or making physical connections, I still need to be next to the board. But for so much of what I do – grabbing sensor data, optimizing internal algorithms, or fine-tuning low-level drivers – the board could genuinely be anywhere. That’s when I decided to dive deep into making “embedded programming over network” a reality for my setup.
In this tutorial I share my personal journey and experiments, including the dead ends, so you can learn from my mistakes and build your own flexible remote lab. I’ll show you exactly what worked for me.
My First Idea: The Promise of USB/IP
My initial thought, being a tinkerer at heart, was to go full open-source. I read about usbip, a fascinating project directly incorporated into the Linux kernel that lets you share USB devices over a network. “Perfect!” I thought. “I’ll just grab a Raspberry Pi, set it up as a server, and my MacBook will be the client. Easy-peasy.”
What is USB over IP anyway?
In simple terms, it’s like a virtual extension cord for your USB devices. You plug your real USB device into one computer (the “server”), and over the network, it appears as if it’s plugged directly into another computer (the “client”). The USB data gets wrapped up in network packets and sent across your Wi-Fi or Ethernet.
So let’s prepare the Raspberry Pi
I had my Raspberry Pi ready and I used the Raspberry Pi Imager to flash a fresh copy of Raspberry Pi OS Lite (64-bit) onto an SD card. It’s pretty handy how you can set up the network, hostname, and SSH access right in the imager – definitely a time-saver for a headless setup.
As soon as the Raspberry Pi is ready with the new OS on the SD card, I connect it to power and look for the IP address in my local network. With the predefined configuration, I SSH into the Pi. Then came the usbip server part and I ran:
sudo apt-get install usbip
Followed by these commands to get things going:
# Let's see what's connected locally first
usbip list --local

# Need to enable those kernel modules for usbip
sudo modprobe usbip_core
sudo modprobe usbip_host

# Now, bind my dev board (make sure your busid matches your device!)
sudo usbip bind --busid 1-1.3 # (My specific device ID at the time)

# And finally, kick off the daemon
sudo usbipd -D
I had the usbip server running on my Raspberry Pi, ready to share its USB treasures. The next step was the client, and this is where my beautiful open-source dream fell apart.
The macOS Client Headache: Why I Pivoted to VirtualHere
My main development machine is a MacBook, and this is where the usbip plan stumbled. After a quick search, I just couldn’t find a direct, easy-to-install usbip client package or open-source library that reliably worked for macOS. I read countless forum discussions – lots of people reporting hassles or just sharing their frustrations. It seemed like usbip really preferred Linux or Windows on the client side.
So, being the pragmatic maker I am, I decided to look for alternatives. I stumbled upon VirtualHere, a commercial product that also does “USB over IP.” They offer a trial version, and I figured, why not give it a shot?
My first attempt was to use the VirtualHere client on my Mac to connect to my existing usbip server on the Raspberry Pi. I used the Pi’s IP address and port 3240, and the client actually showed the remote device! Looks promising, I thought. But then, after just a few seconds, it vanished. The auto-discovery would pick it up again, but then it’d disappear again after about 10 seconds. That seemed strange.
This made me pause. My first thought was, maybe this is a “feature” of the trails version or a bug. But later change my thought to what if it wasn’t the client app’s fault? Maybe my server setup (my usbip on the Pi) was the problem, or perhaps the two just weren’t meant to play nice together, and they use slightly different ports communication/synchronization. So, I decided to go all-in on VirtualHere for both the server and client. And guess what? It worked!
Here’s how I got the VirtualHere server running on my Raspberry Pi:
wget https://www.virtualhere.com/sites/default/files/usbserver/vhusbdarm
# Make sure you get the right ARM version for your Pi OS (32-bit vs 64-bit!)

# The full list of versions can be found here:
# https://www.virtualhere.com/usb_server_software

sudo chmod +x vhusbdarm
sudo ./vhusbdarm
Running that last command fired up the server, and for the first time, I saw a stable connection! To make sure it stuck around even after a reboot, I needed to set it up as a persistent service using systemd. This is important for a truly “set it and forget it” remote lab.
The developers from VirutalHere also provide an installation script, which should simplify the installation and systemd setup, but for me this didn’t work. Feel free to give it a try: https://github.com/virtualhere/script
curl https://raw.githubusercontent.com/virtualhere/script/main/install_server | sudo sh
Making VirtualHere Stick: The Systemd Magic
To ensure VirtualHere starts off every time my Raspberry Pi boots up, I created a systemd service. This might sound a little intimidating if you’re new to Linux services, but trust me, it’s just copying and pasting a few lines of text into a file.
1. Create the Service File:
sudo nano /etc/systemd/system/virtualhere.service
2. Paste This Content:
(Adjust the ExecStart and WorkingDirectory if your vhusbdarm file is in a different spot or named differently!)
[Unit]
Description=VirtualHere USB Server
After=network-online.target

[Service]
ExecStart=/home/pi/vhusbdarm -b # My path, check yours!
WorkingDirectory=/home/pi/ # My working directory
User=pi
Group=pi
Restart=always
RestartSec=5s

[Install]
WantedBy=multi-user.target
A quick note on what this means:
Description: Just a friendly label for my service.After=network-online.target: This tells the Pi, “Hey, wait until the network is fully up and running before trying to start VirtualHere.” Smart, right?ExecStart: This is the command to actually run the VirtualHere server. The-bmeans it runs quietly in the background.WorkingDirectory: Where the server executable lives.User=piandGroup=pi: I’m telling it to run under the defaultpiuser, which is usually fine for this kind of setup.Restart=always: If, for some reason, VirtualHere crashes (it rarely does, thankfully),systemdwill automatically try to restart it after 5 seconds. Super handy!
3. Save and Exit:
Press Ctrl+O, then Enter, then Ctrl+X.
4. Activate the Service:
Now, for the final commands to tell systemd about our new service and fire it up:
sudo systemctl daemon-reload # Tells systemd to read our new file
sudo systemctl enable virtualhere.service # Makes it start on boot
sudo systemctl start virtualhere.service # Starts it right now!
5. Verify It’s Running: You can always check if it’s active with:
systemctl status virtualhere.service
You should see “active (running)”. To be extra sure it’s listening for connections, you can check for port 7575 (VirtualHere’s default):
netstat -tuln | grep 7575
Look for an entry like tcp 0 0 0.0.0.0:7575 0.0.0.0:* LISTEN. That means it’s ready for action!
Hardware Check: What I Used
For this setup, I stuck to some pretty standard gear:
1. Raspberry Pi 4 (2GB RAM):
This is what I used, and it’s fantastic for this. Plenty of power, and its USB 3.0 ports are great for stable connections. A Pi 3B+ would probably work fine too, especially for less demanding boards. I’d shy away from the original Pi Zero W due to its limited power and single micro-USB port, but a Zero 2 W could be interesting for a super tiny setup if you’re feeling adventurous (just remember the USB adapter!).
2. Pi Essentials:
A reliable 5V USB-C power supply (I used a 3A one for my Pi 4) is non-negotiable for stability. A decent 16GB microSD card was plenty for Raspberry Pi OS Lite and VirtualHere. I also put my Pi in a little case, mostly to keep it safe from my clumsy hands.
3. My Dev Board:
This is the cool part – this solution works with virtually any development board that connects via USB! I tested it extensively with my Nucleo-F411RE board and STM32CubeIDE, but I’ve also seen it work beautifully with ESP32s, ESP8266s, and even Arduino boards. As long as your board appears as a standard USB device (like a serial port, a debugger, or a DFU device), you’re golden.
4. Network:
I primarily used Ethernet for my Raspberry Pi because it offers the most stable and lowest-latency connection, which is really nice for debugging. Wi-Fi works too, but you might notice a tiny bit more variability in connection quality, especially if your Wi-Fi signal isn’t super strong.
Getting Client Side Connected
This was the part that made all the difference after my usbip woes.
1. VirtualHere USB Client for macOS:
I headed straight to the official VirtualHere website (virtualhere.com) and grabbed the macOS client. It’s usually a .dmg file – super straightforward to install, just drag it to your Applications folder.

2. Launch and Connect:
Once installed, I launched the VirtualHere client. The magic moment happened when it auto-discovered my Raspberry Pi running the VirtualHere server, it just popped up. If, for some reason, yours doesn’t (maybe you have a complex network or firewall), you can always right-click in the client window and choose “Specify USB Servers…” → “Add…” then type in your Raspberry Pi’s IP address.
Once the server appeared, I expanded it, and there was my Nucleo board listed, just waiting to be used. I right-clicked on it (it showed up as “STMicroelectronics ST-LINK/V2”) and clicked “Use this device.”

I check in my terminal under /dev/ the connected devices, and also in the finder the new device was visible. It was like the board was plugged directly into my MacBook.
The Moment of Truth: Flashing & Debugging Remotely
This is where the flexibility really shines. Once the VirtualHere connection is active, your development tools simply see the remote board as if it’s a local USB device. No special configurations needed in your IDE for the most part.
1. Plug Your Dev Board into the Raspberry Pi:
First things first, make sure your Nucleo-F411RE (or whatever board you’re using) is plugged into one of the Raspberry Pi’s USB ports. Double-check that the VirtualHere client on your MacBook is running and actively “using” the device.
2. Open Your IDE:
I fired up STM32CubeIDE on my MacBook and opened my current project for the Nucleo, the drone telemetry system.
3. Flashing Firmware:
I navigated to my project’s build settings (usually the “Run” or “Debug” configurations). The IDE, without any problem, detected the virtual ST-LINK/V2 programmer over the VirtualHere connection. It was just like being locally connected. I hit the “Run” (flash) button, and watched as my firmware compiled and then uploaded to the Nucleo board, all over the network.
The progress bar zipped along, and moments later, my board reset with the new firmware. Success!
4. Debugging Remotely:
This is where the real power is, for me. I started the debugging session and inspected the live expressions variable coming from the sensor via the ST-LINK/V2 – all from my MacBook.

This solution isn’t just for STM32, by the way. If you’re using an ESP32 board with PlatformIO in VS Code, for example, esptool.py (PlatformIO’s flashing tool) will automatically detect the virtual serial port. You can flash firmware and monitor serial output exactly as if the ESP32 were locally connected. Same goes for the Arduino IDE; it’ll list the remote COM port as if it were right there.
Troubleshooting and My Best Practices
Even with a solution as seemingly magical as VirtualHere, things can occasionally go sideways. I’ve hit a few things myself, so here’s what I learned about troubleshooting and keeping everything running smoothly:
The Disappearing Act:
-
What happens: Sometimes, especially if your development board resets during a flash (which briefly disconnects its USB), or if your network isn’t super stable, the device might briefly disappear from your client.
-
My fix: The VirtualHere client is pretty good at auto-reconnecting. If it doesn’t, a simple right-click on the device in the VirtualHere client and selecting “Use this device” usually brings it back. This is why I stress a strong Wi-Fi signal or, ideally, an Ethernet connection for the Raspberry Pi – it makes a huge difference in stability.
“Client Can’t See Server”:
-
What happens: Your MacBook client just isn’t showing your Raspberry Pi server.
-
My fix:
- First, is the Pi even on?
- SSH into the Pi and check if the VirtualHere server is running:
systemctl status virtualhere.service. If not, trysudo systemctl start virtualhere.service. - Is your MacBook on the same network? Is the Pi’s IP address correct if you’re adding it manually?
- Check for firewalls! Rarely, your router or even the Pi’s own firewall (if you’ve set one up) might block port 7575 (VirtualHere’s default).
“Device in Use” Errors:
-
What happens: Occasionally, after a rough disconnect or an unexpected crash, the VirtualHere server might still think your device is “in use” even when it’s not.
-
My fix: I just restart the VirtualHere service on the Raspberry Pi:
sudo systemctl restart virtualhere.service. Usually clears it right up.
Performance Expectations:
While this setup is fantastic for most embedded programming tasks, extremely high-bandwidth USB devices (like high-res webcams, though you probably wouldn’t use those for this!) or scenarios requiring absolute nanosecond-level timing might experience a very slight latency compared to a direct USB connection. For flashing firmware and typical debugging, honestly, I’ve found it perfectly acceptable.
My Best Practice: Seriously, if you can, plug your Raspberry Pi into your router or switch with an Ethernet cable. It’s just inherently more stable and lower latency than Wi-Fi, especially if your Wi-Fi network is congested.
Security (A Quick Thought):
Remember, by exposing USB devices over your network, anyone else on that network could potentially access them. For my home lab, I’m not too worried.
My Best Practice: Only set this up on a trusted local network. I would not expose my Raspberry Pi (or the VirtualHere server) directly to the wider internet without some serious network security layers (like a robust VPN setup).
VirtualHere Trial:
Just a heads-up: the free trial version of VirtualHere limits you to using one USB device at a time. For my hobby projects, that’s fine. If you eventually want to connect multiple development boards simultaneously (maybe for a big test rig), you’ll need to grab a full license. It’s usually a one-time purchase per server, which isn’t too bad if you find it invaluable.
Beyond the Basics: What’s Next?
Once you’ve got this setup humming along, you might start dreaming bigger, just like I did:
-
Multiple Boards: With a full VirtualHere license, you could actually plug a USB hub into your Raspberry Pi and connect unlimited development boards. Imagine a “remote device farm” where you can switch between boards from your desk.
-
Automation: For the really adventurous, you could even script the connection and disconnection of devices using VirtualHere’s command-line client, further automating your workflow.
-
Commercial Solutions: While this DIY approach is awesome, it’s worth knowing that there are industrial-grade solutions out there, like Digi AnywhereUSB. These are designed for managing hundreds of USB devices in a corporate or industrial setting, offering robust reliability and centralized management, but they come with a much higher price tag. High-end debug probes with built-in Ethernet/Wi-Fi also exist, but they’re typically specific to certain microcontroller architectures.
For me, this Raspberry Pi and VirtualHere combo has been a game-changer. It’s affordable, relatively simple to set up, and delivers exactly what I needed: true flexibility in my embedded programming workflow. I can now say goodbye to that annoying USB cable and hello to untethered development.
Give this setup a try yourself and let me know how it goes in the comments below. If this tutorial helped you break free, please consider subscribing to my newsletter or podcast for more practical maker guides and embedded systems adventures!